
Recording
Desktop & mobile apps
What Caven Studio and the Caven mobile app do, and how to install them
Recording happens in one of two apps. The web app never records itself; it is where you review, edit, and share recordings afterwards. You can start a desktop recording from the web app, though: see Recording a meeting.
- Caven Studio, the desktop app, records meetings on your computer: video calls and screen-shared sessions.
- The Caven mobile app records audio for in-person meetings.
Both upload to the same Library in the web app, where processing continues.
For the step-by-step of starting a recording, see Recording a meeting.
Caven Studio (desktop)
What it captures
One screen or one application window, together with your microphone (your voice) and system audio (everyone else on the call). You pick the microphone and system-audio source in the app. You can also record audio only, with no video.
Install
Windows and macOS (both Intel and Apple Silicon). Download it from Settings → Desktop Application in the web app, or from the last step of onboarding. Sign in with your Caven account. That same web page is where you tune part of how the recorder behaves; the rest lives in Caven Studio's own settings panel. See Desktop app settings.
The app updates itself after the first install. Its settings panel shows the installed version and has a Check for updates button.
macOS: Caven Studio needs Microphone and Screen & System Audio Recording permission under System Settings → Privacy & Security, or recording will not start. Recording system audio needs macOS 14.2 or later. Accessibility permission is optional: Caven uses it to read speaker names from the meeting app. Run Caven Studio from your Applications folder, not from Downloads or the installer window, or it cannot update itself.
Windows: the first launch can show a SmartScreen warning. Choose More info → Run anyway.
First launch
The first time you open Caven Studio, a short setup walks you through four steps: Get started, Permissions (grant the access listed above), Set up (an audio check that confirms Caven hears you and your computer) and Learn (a short tutorial video). See Account & onboarding.
While it runs
Caven Studio runs in the background. On macOS you find it in the menu bar, on Windows in the system tray: click the Caven icon to open the recorder. The recorder is a small bar that stays on top of your other windows, so you can start, pause, and stop a recording without switching windows.
When a recording stops it uploads on its own. Once the upload succeeds, the local copy is removed from your computer. A recording that has not been sent yet shows Waiting for upload on the recorder bar, with Upload and Delete. Recordings that are not uploaded yet always stay on your computer.
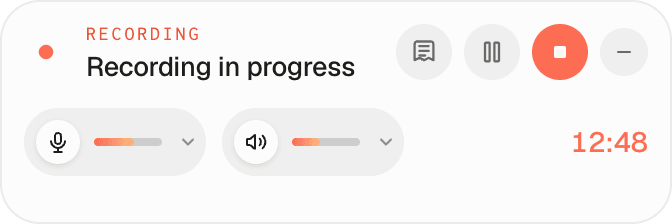 The Caven Studio recorder bar during a recording, with the timer and the microphone and system audio meters
Caven mobile
The mobile app records audio only, for in-person meetings. Put your phone on the table; the app keeps recording while the screen is locked or another app is open, and uploads the recording when you stop.
It runs on iOS and Android. Search for Caven in the App Store or Google Play, and sign in with your Caven account.
For recording, linking to a calendar meeting, interruptions and everything else on your phone, see Mobile app.
Which one do I need?
| Situation | App |
|---|---|
| Video call on your computer (Meet, Teams, Zoom) | Caven Studio |
| Screen-shared or in-person meeting at your desk | Caven Studio |
| In-person meeting away from your desk | Caven mobile |